While Apple laptops are my gold standard for laptop design and usability, there is a special place in my heart for old-school Thinkpads that are built like tanks and ready to go to work wherever they are, especially with their full array of ports, removable components, and roll cages. This is a guide for turning a Lenovo Thinkpad T420 into an even more powerful multi-tool running both macOS and Windows 10.
Like most Thinkpads, my T420 came out of the box running Windows; Windows 7 to be specific. I took advantage of the free upgrade to Windows 10 and have not found any issues driver-wise so the guide will start from this assumption. Speaking of starting, there are a few more things you need before we begin.
Prerequisite
- Access to a Macintosh and a 8GB or larger USB drive; you will need them to download macOS High Sierra (10.13)
- A macOS-compatible Wi-Fi card: the one that came with the T420 is not compatible with the OS. I recommend the Dell DW 1510 AGN Wi-Fi card.
- A secondary hard drive: you can either get a mSATA or a laptop HDD but if you go with the latter, you will need an ultrabay caddy to hold one of the hard drives. I went with an inexpensive HP M700 120GB SSD and this ultrabay caddy.
Let's get started.
1. Prepare the macOS installation USB
Since this is the only step we will need a Macintosh for, we will go ahead and do this first. Fire up your Apple computer of choice for the following steps.[1][2]
- Download macOS High Sierra from the App Store; file size should be 5.2GB
- Insert your USB drive and open Disk Utility
- Go to View > Show All Devices
- Select the USB disk itself (not the volume) on the left pane and erase it using the following settings:
- Name: USB
- Format: Mac OS Extended (Journaled)
- Scheme: GUID Partition Map
- Open Terminal and enter the following command:
sudo /Applications/Install\ macOS\ High\ Sierra.app/Contents/Resources/createinstallmedia --volume /Volumes/USB --applicationpath /Applications/Install\ macOS\ High\ Sierra.app --nointeraction
- After about 30 minutes, you will see the message "copy complete" indicating you are ready to continue
- Download and launch Clover Configurator
- Find EFI on EFI, Install macOS High Sierra at the bottom and mount the EFI partition; you should see a new EFI drive with an EFI folder inside containing two folders: BOOT and CLOVER
- Download the latest tluck Clover files and extract it
- Go to where you've extracted the Clover files and find the Utilities folder; open that and install the Clover package to the EFI partition on the USB drive, choosing only Install for UEFI booting only option
- Go back to the extracted Clover files and copy the entire EFI folder into the USB EFI partition, using the merge option when prompted
- Finally, go into the EFI/CLOVER folder inside the USB EFI partition and rename
config.1600x900.plisttoconfig.plist; rename the 1366x768 file instead if that is your screen resolution - Use Clover Configurator to unmount the EFI partition to finish this step
You can now put away the Apple computer and switch your attention over to the Thinkpad T420.
2. Upgrade to Windows 10 Creators Update
In case you haven't already given in to Windows Update's nags, you should first update to the Creators Update (Version 1703, Build 10.0.15063) or later. This version allows us to convert MBR booting Windows 10 into an UEFI booting version quickly.[3]
- Open Disk Management (Windows Key + X for menu)
- Locate the drive with the primary system boot partition
- Right click on the Disk section at the left of the partitions
- Select Properties > Volumes; if you don't see this you're in partition properties and not disk properties
- Confirm that the partition style is MBR; if it is GPT you don't need to go any further with the next steps
- Open Command Prompt with administrator privileges
- Enter this command:
mbr2gpt.exe /convert /allowfullOS - Once completed, reboot and go into BIOS
- Navigate to Startup > UEFI/Legacy Boot and change option to UEFI only
- Boot back into Windows and follow steps 1-4 again
- You should be rewarded with partition style GPT
3. Upgrade BIOS for Wi-Fi card
For reasons unknown, Lenovo has decided to block the use of any Wi-Fi card outside of their official cards. Thus, we will have to install a modified BIOS to whitelist unsupported cards.[4]
- Download the offical v1.48 BIOS from Lenovo and install it
- Once updated, boot back into Windows and download my modified v1.48 BIOS
- Follow the
README.txtfile and install accordingly - Boot into BIOS and reset all configurations, then check the following:
- Set Config > Serial ATA (SATA) > SATA Controller Mode Option: AHCI
- Set Security > Memory Protection > Execution Prevention: Enabled
- Set Config > Graphics Device: Integrated Graphics
The version of the BIOS I have above includes an updated VBIOS 2170 for the Intel graphics card which will give us a full resolution (1600x900) Clover boot menu. We are also disabling Nvidia Optimus as Nvidia drivers are quite complicated to set up on a Hackintosh. If you don't have an Nvidia Optimus card, you can ignore that part.
4. Install the hardware
Now that the BIOS is ready, you can open up the laptop and install your Wi-Fi card using the instructions here. You should also replace the HDD containing Windows 10 OS with your new secondary drive. The instructions for laptop HDD replacement is here.
Feel free to insert the Windows 10 OS drive into the ultrabay caddy but do not put the caddy into the laptop just yet. We want to install macOS onto to new empty hard drive without messing up the Windows 10 OS.
5. Install macOS High Sierra
Now onto the good stuff. This part should actually be fairly straightforward if the preparation work was completed correctly.
- Insert the USB drive into the Thinkpad and hit F12 on boot-up
- Select USB drive as the boot device and boot into Clover
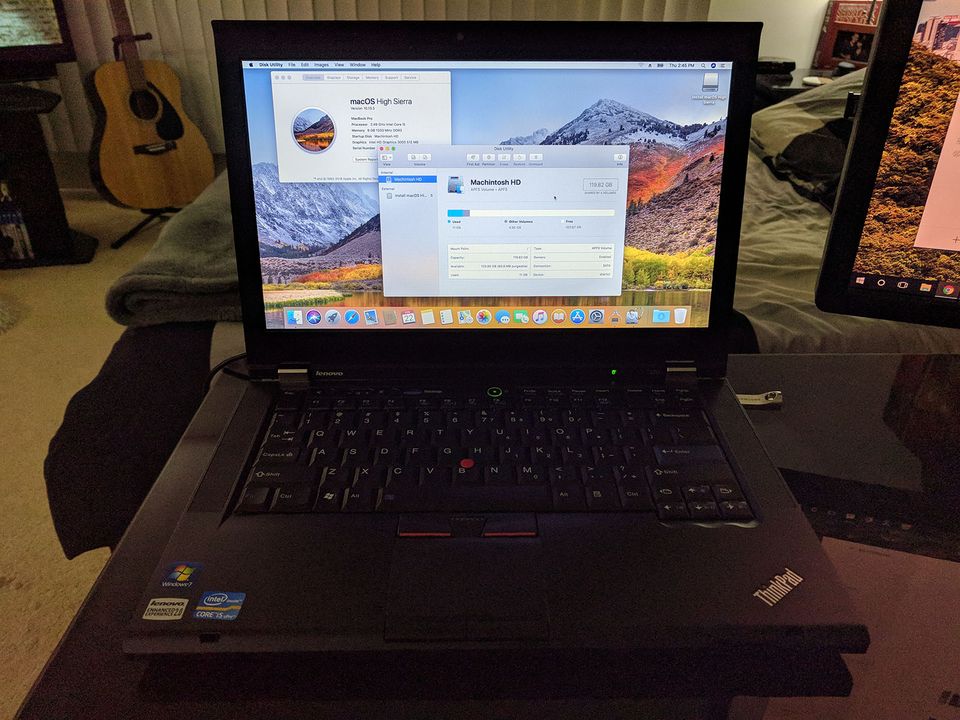
- Choose Boot macOS Install from Macintosh HD to start the macOS installer
- Launch Disk Utility and go to View > Show All Devices
- Select the new hard drive itself (not the volume) on the left pane and erase it using the following settings:
- Name: Macintosh HD
- Format: Mac OS Extended (Journaled)
- Scheme: GUID Partition Map
- Close Disk Utility and select Install macOS
- Follow all the installer steps
- When it reboots again, hit F12 and choose the USB drive to go into Clover
- Choose the new entry Boot macOS from Macintosh HD
- You should now be greeted by a mostly full functional macOS system
6. Post macOS installation setup
While macOS is at this point fully installed, there are a few post installation steps we must take to allow Clover to boot macOS without the USB drive. We will also make some other final adjustments.
- Copy the Clover Configurator from Step 1 and launch it
- Mount both the EFI partitions on Macintosh HD and the USB drive
- Copy the entire EFI folder from the USB EFI to the Macintosh HD EFI
- You should end up with 3 folders: APPLE, BOOT, and CLOVER
- Use your favorite text editor (I use Sublime) and edit
config.plist - Update the following part so that Clover will auto-boot to macOS
<key>Boot</key>
<dict>
    ...
    <key>DefaultVolume</key>
    <string>Macintosh HD</string>
    <key>Timeout</key>
    <integer>5</integer>
    ...
</dict>
- You can change the timeout to the number of seconds you want to wait
- Copy the tluck Clover files from Step 1 to the Downloads folder
- Install custom kexts to macOS /Library/Extensions folder by running:
cd ~/Downloads/Lenovo-T420-Clover-YYYY.MM.DD/EFI/CLOVER/kexts/
sudo ./_kext-install.command
- Reset ethernet to
en0to help with iMessage setup later if desired:
sudo kextload /Library/Extensions/IntelMausiEthernet.kext
sleep 10
sudo rm /Library/Preferences/SystemConfiguration/NetworkInterfaces.plist
- Install display override files to help with display glitches:
sudo cp -a ~/Downloads/Lenovo-T420-Clover-YYYY.MM.DD/\:System\:Library\:Displays\:Contents\:Resources\:Overrides/DisplayVendorID-* /System/Library/Displays/Contents/Resources/Overrides/
Finally, remove the USB drive and reboot the computer. You should now be greeted with Clover by default and macOS will auto-load after set timeout.
7. Dual-boot Windows 10
Now that everything is done, you can insert the ultrabay caddy with the Windows 10 hard drive into the computer. Boot up the computer and you will see that Clover has added an extra Windows 10 option. Go ahead to choose Windows 10 to ensure that you are able to get back into Windows without issue.
Sometimes the Windows boot manager likes to take over and you will find that Clover no longer becomes available and you will always boot into Windows. This can be easily fixed by going into BIOS using F1 on boot and then updating Startup > Boot; put the new hard drive with Clover at the top of the boot priority list and you should be back in business.
8. BONUS: Re-enable Night Shift
One of the best features of current generation OS's is the option to change screen color tones to rest the eyes in the evening. Apple's take on this is call Night Shift and you can re-enable it on the T420 Hackintosh by running the following patch:
xcode-select --install
cd /tmp; curl -s -o NightPatch.zip https://codeload.github.com/pookjw/NightPatch/zip/master; unzip -o -qq NightPatch.zip; cd NightPatch-master; chmod +x NightPatch.sh; ./NightPatch.sh
That's it! Enjoy your dual-booting Thinkpad T420!
Lenovo ThinkPad T420 with UEFI Only ↩︎
Thinkpad X220 macOS High Sierra 10.13 Installation Guide ↩︎
Converting Windows Installation from Legacy to UEFI without Data Loss ↩︎